
 Ask someone what reminds them of Valentine’s Day and they may say roses, a romantic dinner, or more likely than not chocolate! For those of us that definitely include chocolate on our list, here is a very easy way to say Happy Valentine’s Day with a simple homemade treat—Valentine’s Chocolate Wafer Bark.
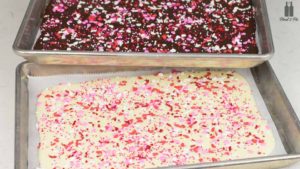
When you think of chocolate bark, you probably think of a thick slab of chocolate with nuts and maybe dried fruit. But this version is thinner and pure chocolate with just sprinkles on top for a little added crunch and color. Don’t get me wrong I love nuts and dried fruit, but sometimes simple is really perfect. So just take a bite, enjoy the initial crunch from the sprinkles, and then close your eyes as the chocolate melts across your taste buds. Whether you prefer milk, dark, or white* chocolate, you can’t go wrong with this one and no one has to know how easy it was to make.
Scroll down for step-by-step videos and the recipe!
Happy Valentine’s Day!
*While white chocolate is not really chocolate, some of us like it anyway. 🙂
Here is how to make this yummy treat. (If you prefer a printable recipe, just scroll to the end.)
The first step is to break the chocolate bars into smaller pieces.
Microwave the chocolate for 30 seconds on half power (50% power). Then stir. As you can see in the video, the chocolate may not have melted much, if any, after the first 30 seconds.
Microwave the chocolate for another 30 seconds on half power (50% power). Then stir again. The chocolate should be starting to melt.
Repeat! For my microwave, I had to heat the chocolate four times for 30 seconds each. After the fourth time, when I stirred, all of the pieces were completely melted.
Add the rest of the chocolate pieces to the warm chocolate. Then stir again. Be patient, it may take a minute or two for the pieces to completely melt so keep stirring. If you want this step to go faster (less stirring), break the chocolate into smaller pieces before adding them to the bowl of chocolate. Warning—do not skip this step and microwave all the chocolate together. This step (adding chocolate to the warm chocolate and letting it melt without more heat) helps to make the final chocolate shiny and helps prevent discoloration (such as light-colored spots) of the chocolate.
Pour the melted chocolate onto a parchment-covered baking sheet. This recipe makes enough for a quarter-size baking sheet, which is usually about 13 inches by 9 inches. (My quarter-size baking sheet is a little shorter than 13 inches though.)
If you are using a larger baking sheeting, only spread the chocolate over an area about 11 1/2 inches by 8 inches. The size doesn’t have to be perfect though.
Sprinkle the sprinkles over the chocolate! I like a lot of sprinkles, but you can cut back if you prefer. I also like to use a variety of shapes. For Valentine’s Day, I used hearts, jimmies, small dots, and large dots in red, white, and pink.
Let the chocolate harden at room temperature. It will likely be ready in less than an hour, but the time varies depending on room temperature and humidity. You can put it in the refrigerator to speed up the hardening, but that may affect the shine and color. Note that refrigeration doesn’t impact white chocolate as much as it does milk and dark chocolate.
When the chocolate has hardened, break it into pieces and enjoy!


- 12 oz. chocolate bars (e.g., Ghirardelli milk, semisweet, or white chocolate premium baking bars, do not use chocolate chips)
- 1 / 4 cup (or a little less) of several types of sprinkles (e.g., hearts, jimmies, and dots)
- Line a baking sheet with parchment paper. I use a quarter-size baking sheet (approximately 9 inches by 13 inches)
- Place 8 to 9 ounces of the chocolate in a microwave-safe bowl.
- Microwave the chocolate for 30 seconds at half (50%) power.
- Stir the chocolate.
- Repeat the microwaving and stirring steps until the chocolate it is melted. (You will likely need to microwave the chocolate for three to five 30 second intervals. Be sure to stir between each 30 second microwave cycle.)
- Add the remaining chocolate to the bowl and stir until the added chocolate is melted. Do NOT microwave it more. The chocolate should slowly melt as you stir it.
- Pour the chocolate onto the parchment paper.
- Using an offset spatula or knife, spread the chocolate into an even layer that is approximately 8 inches by 11 1 / 2 inches.
- Scatter sprinkles across to top of the wet chocolate. Use lots of sprinkles to make it colorful.
- Let the chocolate set up (harden). Refrigerating the chocolate will speed up the hardening step, but it may impact the shine and color of the final candy.
- When the chocolate has hardened, break it into small pieces.
The cook time is approximate. Depending on your microwave, it may take a little less or a little more time to melt the chocolate. Only microwave the chocolate until it is barely melted. Do NOT overcook it or it will not spread and will lose its shine.
If you don't have a microwave or prefer to use the cook top, melt the chocolate using a double boiler. Place an inch or two of water in a pot. Place the pot over a burner and heat the water over medium heat. Place 8 to 9 ounces of the chocolate in a bowl that will sit partway inside the pot. (The top of the bowl needs to be a little wider than the pot so the bowl will not fall into the water. The bowl should sit just above the water in the pot.) With the bowl of chocolate placed in the top of the pot, stir the chocolate until it is melted. Do not let any of the water get into the chocolate. When the chocolate is melted, remove the bowl of chocolate from the pot. Add the remainder of the chocolate to the bowl and stir until it is melted. Then follow the remaining instructions for the microwave method.
© 2019 Pinot & Pie. All rights reserved.

