On football Sundays when I was growing up, our house was always filled with the yeasty, buttery aroma of my dad’s homemade braided bread!
In Texas we took our football seriously, so I think he kneaded out his “game stress” during timeouts and halftime. 🙂 When Jeff and I were watching the last playoff games a week ago, I got a little sentimental and longed for some of Dad’s bread and wanted that delicious smell to waft through the kitchen again. But I wasn’t sure if I could pull it off. Prior attempts did not go so well.
I was pretty sure that my prior failures were because I just didn’t have the right technique for kneading the dough. But recently I very successfully experimented, aided by a great YouTube video, with homemade dinner rolls using my electric mixer and dough hook to knead the dough. (Watch a an upcoming post on the rosemary dinner rolls.) So I decided to try Dad’s recipe again using the electric mixer to handle the kneading.
What I didn’t remember was that all I really had for his recipe were a few of his notes and a couple of pages with an incomplete recipe copied from an unidentifiable cookbook! To further complicate the process, the handwritten notes were a little different than the notes from the cookbook pages. So I did the best to remember what I could from watching Dad make this bread so many times over the years and set out to give it my best shot.
The first step was to proof the yeast by mixing a package of dry yeast with a little sugar and warm water. Then I let it sit for 5-10 minutes or so to make sure that the yeast was still alive. I would know it was good if it got foamy.
While I waited for the yeast to foam up, I scalded the milk. When you scald milk you heat it until the point just before it boils, then take it off the heat. Then I added butter, salt and a tablespoon of sugar to the milk and let the butter melt as the mixture cooled a little.
When the milk had cooled a little and the yeast mixture was foamy, I added the yeast mixture to the milk and gently stirred them together. Now it was time to start integrating the flour, so I added 1 1/4 cups of the flour into the bowl of my electric mixer and poured the wet mixture on top. Then I turned the mixer on low and let the dough hook combine the ingredients to start forming a dough. When all the flour was moistened, it was to time add the rest of the flour. I turned off the mixer and added flour in two or three portions, mixing between each addition to let the newly-added flour just get moistened before adding the next portion. When it was all moist, I turned the mixer up to medium and let the dough hook work its kneading magic for 6 minutes. Why 6 minutes, you ask? Because that worked out great for the dinner rolls I have been making! 🙂 Sure enough, the dough was smooth and ready to go!
The next phase requires some patience. We have to let the dough rise in an olive oil coated bowl for about an hour. I also coated the top of the dough with a little olive oil to make sure that a dry crust didn’t form. Interestingly, Dad’s instructions called for using shortening in the milk instead of butter and shortening to “grease” the bowl and top of the dough instead of olive oil. But then when the bread came out of the oven, Dad always—and I mean always—brushed the tops with loads of butter! So I decided that butter should be in the bread too and olive oil just seemed like a better choice for coating the bowl (again relying on the dinner roll experiments).
After an hour the dough had doubled in size, so I punched it down and placed it on a cutting board where I divided the dough into two equal pieces. I forgot to mention that we are making two braided loaves. Now for the braids, we need to cut each half into three equal pieces for the three parts of the braid. Then roll each piece of the braid into a long log about 10-12 inches long like in the drawing below. Try to make them as equal in diameter as you can.

Now it was time to place parchment on a half baking sheet, which is a large cookie sheet, and place three of the braid pieces on the cookie sheet parallel to the long side of the cookie sheet. Then I connected the three braids together at one end by pressing the dough together and tucking the end of the seam underneath just a little like in the drawing below.

Now for the braiding—just like you braid hair. I remembered that Dad braided it very loosely, leaving a little air between the braids to allow room for rising. I hadn’t braided anything in a long time, but after a little experimenting, I remembered you just bring the right piece over the center but inside the left piece. Then you bring the left piece over the new center piece but inside the current right piece. Continue alternating bringing the right and left pieces over the current center piece until you reach the end of the braids. Then press the ends together and turn a little of the end underneath the loaf to secure it. Repeat for the second loaf!
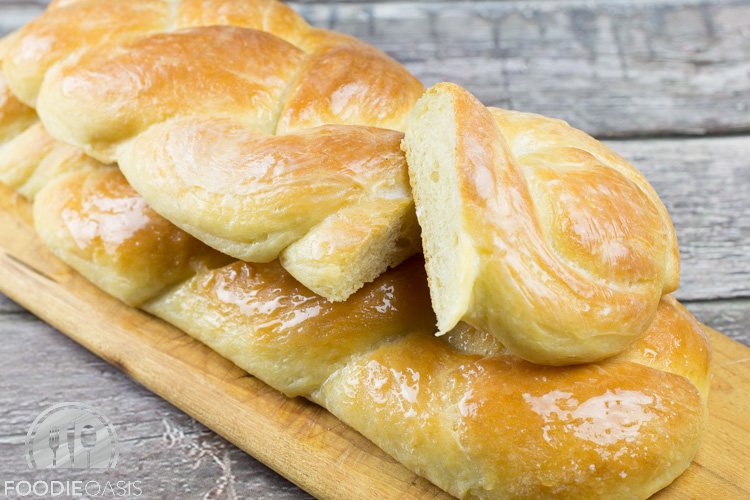
Then I gently rubbed a little olive oil on top and let it rise for another hour. We want this to be a light and tender loaf of bread rather than like denser traditional loaves. Given my recent dinner roll experiment, I figured out that this recipe is more like a dinner roll dough than a traditional loaf of sliceable bread.
About 20 minutes before the rising time was up, I preheated the oven to 400 degrees F.
When the oven was preheated and the dough had finished rising, it was time to bake the loaves for 10 minutes. Then I followed Dad’s instruction on one of the little pieces of paper I found and lowered the oven temperature to 375 degrees F. Why? I really don’t know yet, but Dad’s notes said to and his bread was awesome, so I wasn’t going to mess with this step. Then it took another 20-25 minutes for the bread to turn golden brown.
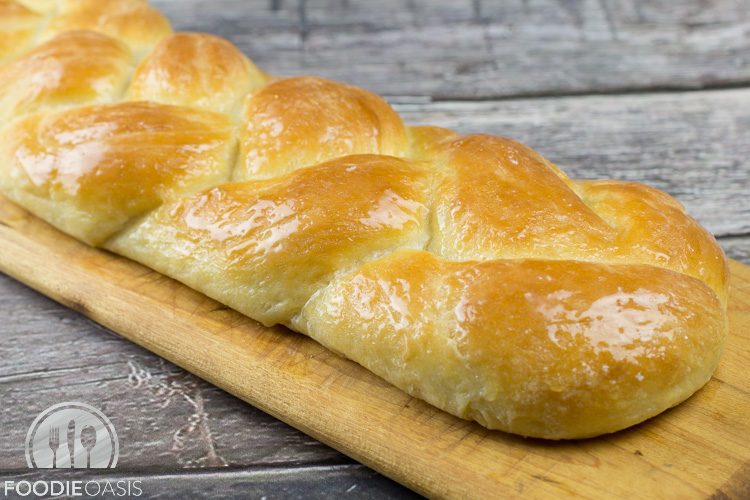
Now for the decadent addition—melted butter slathered all over the top and in the seams between the braids. Dad probably put two tablespoons on melted butter on each loaf! See how it glistens! I couldn’t wait to bite into it! Wow! It tasted like Dad’s, or at least really close. Good memories…
Football and Dad’s bread—the perfect Sunday afternoon! A tradition has been reborn. Now time for the Super Bowl!

- 1 pkg. dry yeast
- ¼ cup warm water (100 degrees F)
- 1½ tsp. salt
- 5 Tbsp. butter (1 Tbsp. for the dough, 4 Tbsp. melted to brush on the finished loaves)
- 1 Tbsp. plus 1 tsp. sugar
- 1 cup milk, scalded
- 3 cups flour
- 2 Tbsp. olive oil
- Combine yeast, 1 tsp. sugar and warm water (about 100 degrees F, just warm to the touch). Let it sit until yeast foams, 5-10 minutes.
- While you are waiting for the yeast to foam, scald the milk. (Heat it just until it almost boils, then remove it from the heat.)
- Remove the milk from the heat and add butter, salt, and 1 Tbsp. sugar into the milk.
- When the butter has melted, add the yeast mixture into the milk mixture and stir to combine.
- Combine milk mixture and 1¼ cups flour in the bowl of an electric mixer fitted with a dough hook.
- Run the mixture on low until the flour is moistened.
- Add 1¾ cups flour, about ¾ a cup at a time and mix on low until the flour is moistened before the next addition.
- Then knead the dough on medium for 6 minutes.
- Rub olive oil on the inside of a large bowl. The bowl needs to be large enough to allow the dough to double in size.
- Place the dough in the bowl and rub the top of the bread with a little olive oil.
- Let the dough rise until it doubles in size, about 1 hour
- Divide the dough in half. Cut each half into three equal pieces. Roll each piece into a long strand, about 10-12 in inches long.
- Place them on a baking sheet lined with parchment.
- Press the ends of three strands together. Then braid three strands. Press the ends together and turn them under slightly to secure them. Then braid the other three strands creating a second loaf.
- Let the braided bread loaves rise for an hour.
- About twenty minutes before the loaves are finished rising, preheat the oven to 400 degrees F
- Bake the bread for 10 minutes.
- Then lower the oven temperature to 375 degrees F.
- Bake the bread until it is golden brown, about 20-25 minutes more.
- When the bread is almost ready, melt 2 tablespoons of butter.
- When the bread comes out of the oven, generously brush butter over the top of each loaf.
© 2016 FoodieOasis
